Friday, August 31, 2012

Stella & Dot

Happy happy Friday friends! The weekend is here, yay!
Last night I hosted a Stella & Dot trunk show for a friend of mine. I had so much fun making food and setting up a fun party for my girlfriends. Despite the harsh reality check in regards to my popularity, a few of us had a great time hanging out. We ate yummy snacks, and indulged in adult-only beverages. The kids slept at my mom's house and Josh was at work so I was totally free to relax and enjoy :) Here are some pictures of the par-tay...

My friend set up such a lovely display. Stella & Dot really has such beautiful jewelry.
 
 
(These pinterest inspired mini caprese salads were drizzled in Balsamic vinaigrette)


All in all, it was a fun night. Special thanks to Melinda for setting up all of the beautiful baubles, and to my sister in law Darcy for bringing a yummy appetizer. My sister lent me the cool beverage tub and brought some ice to keep our beverages nice and cold. She's the best sister around!
 
If any of you are interested in purchasing anything from Stella & Dot, here is a link to my trunk show. I will get credit for any items purchased with this link for the next week.
 
 
I hope you all have a wonderful weekend!


Thursday, August 30, 2012

Chandelier {LOVE}

(Get ready for LOTS of pictures people).

I love chandeliers. I personally think every room should have one. Now, that is not practical nor affordable, I know. I have a chandelier. It's in my kitchen above my sink. I bought it with some wedding gift cards about 9 years ago when we bought our first condo. Wanna see it?
Close-up.
When we first bought it from Lowes I was in love with it. It was replacing a hideous ceiling fan in our tiny condo and I was thrilled. After we moved in to our current house 3 years ago, we hung it up over the sink and called it a day.

Once I started diy'ing the heck out of this house, I knew I wanted to change it. It just felt kind of blah and I knew it could use some freshening up. So, she came down.

My first step was to remove those clear beads that ran along the body of the chandelier. I also removed all of the amber drops (If I'm being honest, those were never my fave).

I gave her a thorough cleaning and then hung her from the tree in the backyard to get sprayed.
And then I had a panic attack because my spray paint freaked out. Ahhhhhhhh!
Look....
Every once in a while, My spray paint goes on all frothy and lumpy. I got a damp paper towel and gently smoothed it out as best as I could, and then continued.

Ready for picture-mania of the "after?"


Here's a closer look...

I found the antique lucite aqua prisms on etsy and they are perfection (if I do say so myself)!!

Here's a wide shot...
We also took down the black valance that we had over the window. We initially took it down to wash it, but it let so much more light in once we took it down so we're keeping it off.

{In LOVE}

It just looks so much more fresh and clean and I-just-love-it! Haha, Can you tell I love it!?
Thanks for enduring picture-mania. I hope you like this makeover :)
Happy Thursday!

Monday, August 27, 2012

POP goes the chair

Happy Monday everyone!! This is our last full week of Summer before the kids start school next Wednesday. I-am-looking-forward-to-it! Haha!!!

I have been working on some stuff around the house lately and I want to share with you a recent chair makeover. Here's the before picture of the chair:
 
 
I have had this chair for about 7 years and it has always been a favorite. I spray painted it a long long while ago, and since then it has gotten a bit yellow-ish. You can't really tell in this pic, but it is. I love the fabric on the seat and have used it on my dining chairs and a couple other places in my house. However, in true diy'er fashion, I'm bored of it and wanted a change.

Here is a shot where you can see the yellowing. I had already sprayed the right side with white:

After a few coats of fresh white spray paint, the seat got some new fabric and I added some "flavor" to the legs. Wanna see the after??

POP!!!!
 
 
The fabric is from Ikea (half a yard for $4) and I used Rub n Buff on the legs for some bling. the throw pillow used to live in my bedroom but looks WAY better on this chair :)


Here's a wide shot of the room looking in from the den (the dream is to one day get new sofas {sigh})


and the view from the front door....

Like??!!

I like :) haha!
Have a great week everyone :)

Saturday, August 25, 2012

Lamp drama

WHY oh why do I torture myself. Lamps. Lamps are a struggle for me. For ages, I have been using the un-stylish (no offense if you use them), ultra bright and functional torchiere lamps. $20 from home depot and they light up the whole room. Perfect (or so I thought). I agreed with my ever so stylish sister that it was time to up the style on my living room lighting. The goal, low budget, stylish, & functional. Seems easy enough, right?! Wrong. Ha!

All of the pretty floor lamps that I love are upwards of $250 dollars. Even if they are on sale they are still too $$$. Anyway, I will spare you a lot of reading and just say, I struggled finding what I was looking for. I ended up at 2 budget friendly places - Target & Ikea. The drama with these places is that the Ikea lamps ONLY go with the IKEA shades. And the Target lamps pretty much ONLY go with the target shades. Not all lamp parts are created equal. Lesson learned (after many back and forths to each store with squirly kids in tow).

Here are the before pictures of the lamps/shades that I ultimately ended up with:

Black table lamp base on clearance at Target for $17.49 and Target Shade $15

Floor Lamp base from Ikea $30 and Ikea shade $20 (with plastic wrap still on)

So far, so good. Not completely over the moon stylish, but basic, clean, and not un-stylish in any way.

I decided to give them a makeover to fit in better with the decor in my living room. I never really spray paint "new" things, so I must admit it was a little unnerving to spray paint something that I just spent decent money on (not a $5 thrift store lamp like in the past). Ok - enough talking, wanna see the after??!

Table lamp:

I went for the "gold dipped" look to coordinate with the gold frames and other gold accents in my living room.
This may not be for you, but I am a gold lover and this lamp makes me soooo happy :)

In order to get the gold dipped look, I simply spray painted the lamp white. Then, because I am so impatient, I didn't want to wait a whole day to be able to tape it off and spray the bottom half gold. So, after the white dried for about an hour, I tightly wrapped a paper towel around the lamp, and then taped over the paper towel (so none of the sticky tape was on the semi-fresh white paint). Then, I sprayed the bottom half gold and immediately removed the paper towel/tape combo. The result ended up looking "dipped" because the paint soaked through the paper towel a bit and made the line of the gold less sharp than a tape line. I think it looks cool. See - impatience sometimes leads to greatness).

The floor lamp also got some gold love:

It's a super gloomy day so I couldn't great pics but here's one of both together so you can see how they look in the room (keepin' it real moment with my tv watching boy).
I'm definitely lamp satisfied now and don't plan on changing up lamps for a loooong time. Haha, Lamp drama! Oh my :)

Tuesday, August 21, 2012

DIY Bulletin board - a minor tweak

Hello there people! The end of Summer is rapidly approaching and we are trying hard to squeeze our last bit of Summer fun in. I have been doing some projects around the house that I have been avoiding and I want to share one today. Last year, I made a memory board for my kitchen out of a HUGE frame that I found thrifting. I can't find the original post, but here is a pic from last December...

It's hard to tell in this pic, but basically, the frame is backed in fabric and there are a few rows of twine strung across with tiny clothes pins. I liked the look of it, but the twine would fill up pretty fast and I felt like the memory board wasn't living up to it's potential.

I decided that making this a cork board would make the entire space more functional and I can fill the whole space. I don't know about you, but I can NEVER find a cork board or roll of cork big enough for what I need. NEVER. So, this time I opted for cork tiles. The problem with tiles is that they are usually so thin, the push pin doesn't go all the way in. I decided that foam core would be the best thing to back the cork tiles with. Take a look....

First I had to trim the foam core to fit the frame.

The, I put all the cork tiles on there and cut them to fit...

Then I took them outside and spray glued the cork tiles onto the foam core...

This little one kept me company while I worked :)

After that, I used spray glue to attach the fabric to the cork...
I didn't leave enough space when I trimmed my foam core to wrap the fabric around, so I trimmed it to fit exactly.

Next, I popped the whole thing back in the frame and used duct tape to secure the back.

Then.......trouble. When we flipped it over, it started to look all lumpy. This meant that the glue had not dried all the way so the cork was separating from the foam core. So, we applied some weight and let it sit for a couple hours....

After that, everything was dry and we hung it back up :)
Wanna see!!?
Now the entire surface is functional :)


I like it much better now and can't wait to fill 'er up!

Happy (end) of Summer to you!!!

Thursday, August 16, 2012

Mr.Toastee

Happy Thursday Friends. The kiddos and I are headed to the beach today but I had to pop on to tell you what happened yesterday. Ok, here's the back story:

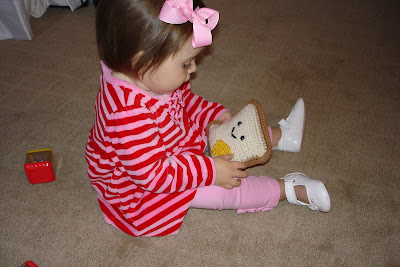
Before Hayden was born, I bought here this ADORABLE little piece of toast on Etsy. Ok, I know you are thinking, what!!? There is this cute Etsy shop called Yummy Pancake and she sells the cutest "crochet type" food items. I thought that it would probably be the cutest thing if my daughter's "security item" was a piece of toast. Haha, too funny!!! She doesn't have a pic of Mr.Toastee on there, but here's her shot of Mrs.Toastee. Isn't she adorable!? Mrs.Toastee didn't exist when I purchased Mr.Toastee, otherwise she would have been my choice.


 Anyway, here is a picture of Hayden with her toastee as a baby...(approximately 11 months old)


Well, as luck would have it, Hayden is a typical kid. She fell in love with a satin blankie and Mr.Toastee never won her heart. But, it has been on her shelf looking cute. Until yesterday.

Do you want to see what I saw when I went into the kitchen yesterday afternoon??? Brace yourself.

DIPPED IN GOOEY CHEESE!!!!!!!! Seriously Hayden!!!?? What the!!?
Haha, luckily he cleaned up ok and now he is safely out of reach. Sheesh! Poor guy!

Just wanted to share my funny story. Happy day to you :)